

Quippe Tour

The Quippe Tour
Welcome to Quippe!
The Quippe solutions include three main components to assist clinicians in caring for and treating their patients: the data, the clinical workspace to act on the data, and the web and data services that connect the workspace and the data. Quippe becomes a tool clinicians use to take care of the patient, to interact with the patient’s chart, and see trends and relevant information, with a note, billing, regulatory compliance, and interoperability all outcomes of that process.
The Data
Quippe includes over 400,000 clinical concepts used to describe the health status of a patient. Concepts are clinical in nature and have meaning in and of themselves – words and phrases clinicians use to describe the patient visit. But behind each concept is a breadth of associated data that qualifies those clinical phrases, making them actionable both for the provider as they treat the patient, and within the broader ecosystem of care.
Each concept is identified with a unique ID that never changes. Concepts have pre-defined properties that provide the additional information needed for coding, billing, reporting, and organizing and filtering the data in a chart and note. This includes more than 1 million links between the concepts themselves and standard terminologies like SNOMED, LOINC, RxNorm, and ICD. Using this rich knowledge base and the tools in Quippe, clinicians can access clinical data that is relevant to the patient and the encounter, and are supported in meeting the requirements for Clinical Quality Measures, HCC’s and billing.
The Clinical Workspace
In most EMR applications, clinicians enter information about a patient visit using a combination of structured forms, drop-downs, navigation trees and free text areas. The final documentation for the patient visit is then generated from this data. While useful in many situations, this approach has many significant failings. It is often difficult for a physician to control, or even correlate, the final printed output from the data entry forms. A fixed form does not lend itself well to representing patient-specific, contextual information at the time of entry. Handling complex, multi-problem situations is very cumbersome with forms, and an inordinate amount of development time is needed to create forms for the enormous variety of medical conditions.
The Quippe approach is to provide an interactive clinical workspace that allows the clinician to focus on treating the patient while having dynamic access to pertinent patient-specific information and relevant clinical concepts. This workspace provides a WYSIWYG view of the visit or episode of care that merges information from multiple sources and surfaces relevant patient history and clinical concepts allowing the clinician to capture the details about the patient’s health at that point in time.
The Web Services and Data Services
Web Services:
Quippe web services provide the mechanism for the Quippe browser interface to communicate with the data services. The web services follow the REST style of web service architecture - meaning they use the existing architecture of the web. Requests are made via standard HTTP verbs and data is returned as XML, JSON, binary, or plain text. The web services bring everything together from providing the concepts and their properties, adding details to the concepts, highlighting and focusing on related concepts, to E&M, CQM, and HCC calculations.
Data Services:
The data services layer provides access to the Quippe Clinical Engine, your EMR database, and any other Medicomp or third-party content and functionality.
You are about to embark on a brief tour of Quippe, highlighting the tool’s capabilities. Quippe is a software development kit, meaning you have the source code and the ability to customize and implement the services, workspace, and data to support your workflows. We present various layouts and formats along with the clinical concepts, which can be used as they are or as a creative spark for other possibilities. You are encouraged to work with your development team and clinicians to customize the appearance of the tool for your specific facility or system. This tour is not intended to teach you everything about Quippe or how to customize specific content. It is meant to give you an overall idea of the capabilities and possibilities of Quippe. More detailed information is contained in the Quippe User’s Guide and the Quippe Design Guide.
Stops Along the Tour
- 1 - Getting Started
- 2 - The Viewer
- 3 - The Basic Note Template
- 4 - Using a Specialty Template
- 5 - Adding Content to a Note
- 6 - Pop-up Forms (Wizards)
- 7 - Text Macros
- 8 - The E&M Calculator
- 9 - Clinical Quality Measures
- 10 - Hierarchical Condition Categories
- 11 - Well Child Visits
- 12 - Clinical Lens
- 13 - Shared Content Library
- 14 - Web Service Tester
Stop 1: Getting Started
To get started, access Quippe either through your development environment or through the quippe.medicomp.com sandbox. This tour uses content from the Medicomp Shared Content Library, so please check to make sure this is available if using your own version of Quippe.
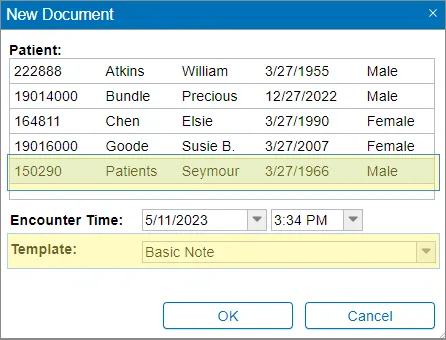
When logging in, select Seymour Patients and Basic Note as the Document Template.
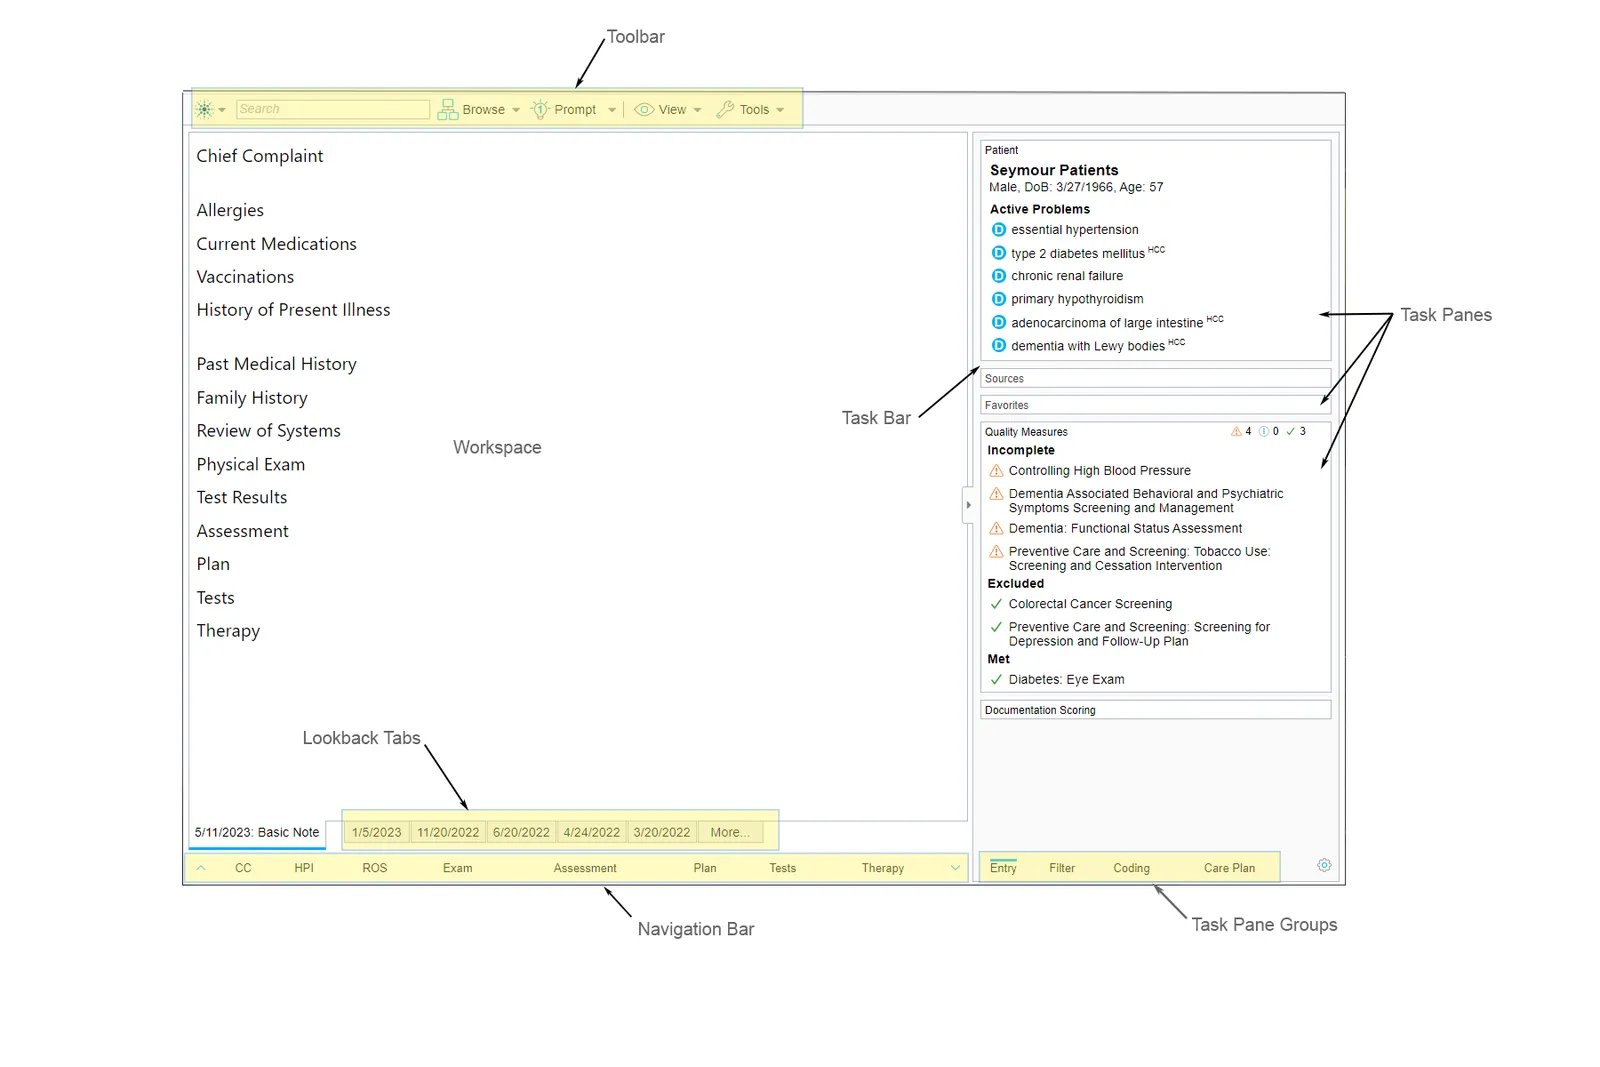
The Quippe Screen
There are multiple areas of the Quippe workspace. However, in your implementation, you may choose to use every element or only a few. You can also opt to use an element but modify it to meet your organization’s needs.
- Toolbar: Similar to other applications, this provides you with various tools to access and manipulate the note and clinical concepts through searches and prompts. It also provides access to functions like Flowsheets, Quality Measure Review, HCC Panel, the E&M Calculator, the Text Macro Editor, and the Quippe Designer.
- Workspace: The workspace is used for data entry and is also the final note. The idea is to align the data entry with the final, printable note so the clinician interacts with it just once. In some EHRs, the data entry looks vastly different from the printable view, forcing the clinician to read the printable view before signing off on the note. With Quippe, what-you-see-is-what-you-get!
- Lookback Tabs: These are the past notes for the selected patient. Click on a tab to review the previous note and to copy forward or cite information into the current note.
- Navigation Bar: This bar holds shortcuts to allow easy navigation of the note. Click on Assessment, for example, to go directly to the Assessment section of the note.
- Task Bar: Contains information and data relative to the patient, the note, and your preferences, along with reference panes such as coding, specialties, and care plans. This is where you access your Favorites list. This area is highly customizable.
- Task Panes: The individual panes that make up the Task Bar; example: Source, Favorites, Coding, Details…
- Task Pane Groups: The names of the groups that contain various Task Panes. You can create your own groups with specific Task Panes.
Stop 2: The Viewer
The root of all of Quippe’s capabilities is the data - in our case - the clinical concepts. This is where we get a glimpse into the Quippe data model to understand what makes the concepts useable at the point-of-care and throughout the clinical workflow. Using the Quippe concepts, across all domains, throughout the clinical workflow, ensures the full functionality of Quippe.
To access the Viewer, click the Tools menu and select Medcin Viewer. The Viewer opens as a new tab next to the Quippe tab with the patient’s name.
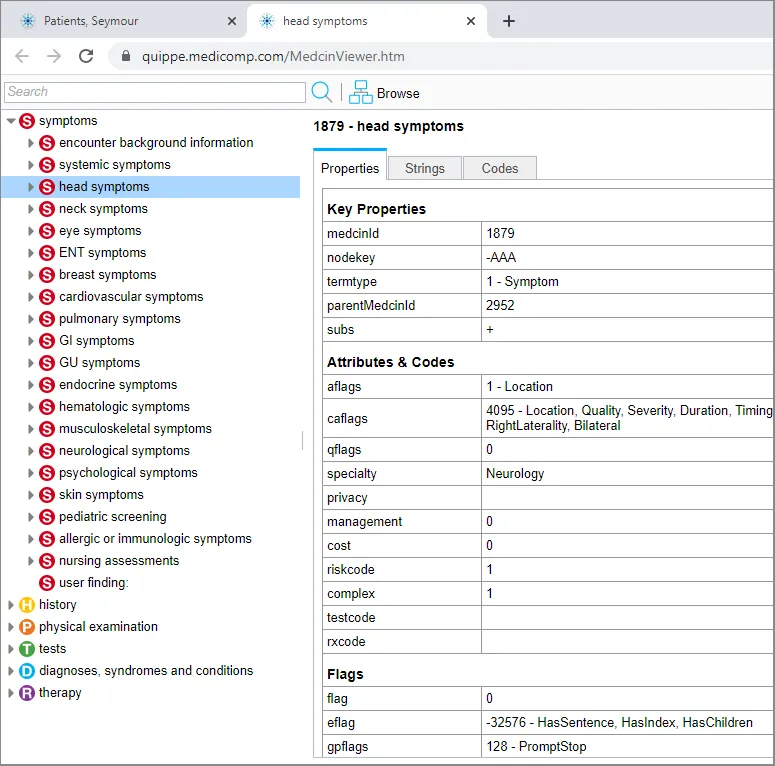
Quippe includes over 400,000 clinical concepts organized into six domains - symptoms, history, physical exam, tests, diagnoses, and therapy. The concepts are in a hierarchical structure, starting with general concepts and becoming more detailed as the parent concept is expanded.
Expand symptoms and then select head symptoms. The Properties tab displays the main properties for that clinical concept. The key ones include:
- Medcin Id: The unique identifier for the concept - it never changes.
- Specialty: The specialty relevant to the concept.
- Risk code: Indicates level of medical/surgical risk to patient - used in E&M coding.
- Complexity: indicates the complexity of the concept - used in E&M coding.
- Quippe section and Group ids: identifies where the concept should be placed in a note.
The Strings tab includes the phrases for the concept when it is added to a note and the Codes tab shows the code maps from the concept to the standard vocabularies.
Use the search box to look up other clinical concepts. Select the desired concept and then click Browse to navigate to the concept within the hierarchy.
Useful Aspects
- Each clinical concept has a distinct id that never changes - in every note, in every template, id 10 is always headache; always. If you want to know how many patients reported a headache in the last year, query on id 10, simple as that.
- Documentation leads to billing - the clinician documents the state of a patient’s mild persistent asthma (id 214046), and because id 214046 is mapped to ICD-10 J45.3, that is the code sent off to billing; it is also mapped to SNOMED 426979002 so it can be added to the patient’s problem list.
- Quippe concepts span all domains and specialties - they can, and should be, the basis for the note, patient summary, problem lists, health history, quality measure and HCC evaluation, E&M, flowcharts, and trending.
Stop 3: The Basic Note Template
A template is the starting point for a note and defines the layout and visual style. It also controls where findings and content are placed when added. The Basic Note template is the core template in the Medicomp Shared Library. When designing or creating a new template, we start with the Basic Note. It includes the major headings in an outpatient note and includes a container (chapter, section, or a group) for all findings in the Quippe hierarchy.
As you add content to the note, practice documenting positive (or abnormal) findings, negative (or normal findings) and returning a finding back to its neutral state. This is accomplished by successive clicks on a finding.
**Add a Finding: ** In the search field, type cough. Select the first one in the list (S=Symptom) and then Add to Note. Cough is added to the note in the Pulmonary Symptoms group of the Review of Systems section. Click it once to indicate the patient has a cough; twice for ‘no cough;’ and a third time to return it to its unentered state.
**Add a List: ** Now try merging in a list of findings. From the Favorites Task Pane, double-click Multi-System. This is a list of commonly used findings and they are all placed appropriately within the note structure.
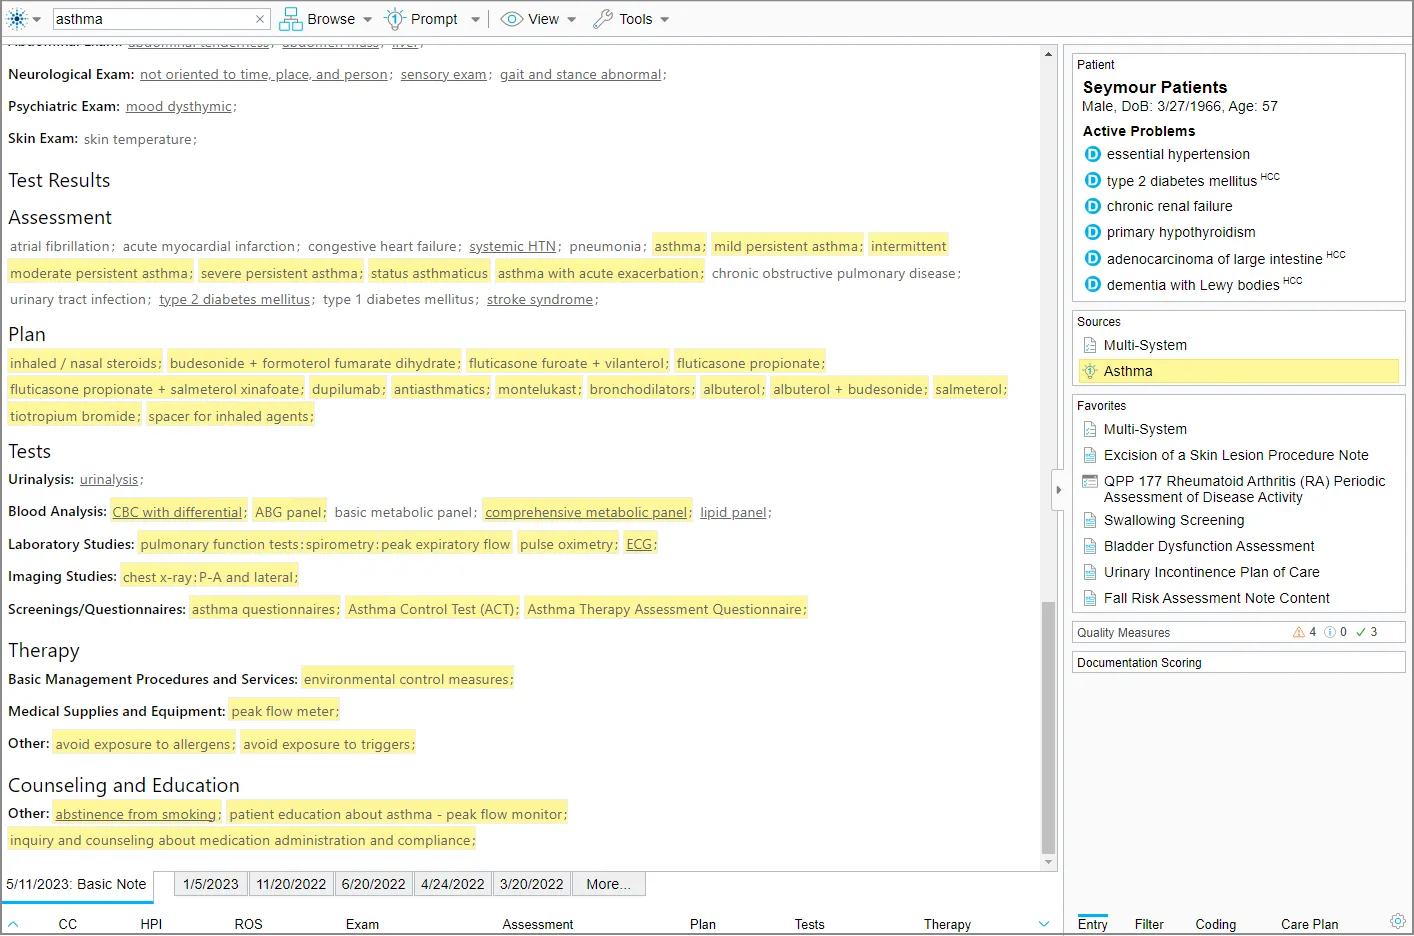
**Use the Diagnostic Prompt: ** Now, let’s make Quippe work for us by generating a list of findings related to a diagnosis. Enter Asthma in the search field, select Asthma (D=Diagnosis) and then click Merge Prompt. The Clinical Data Engine provides a rich list of findings related to Asthma.
Useful Aspects
-
Underlined Findings: This means that a specific finding has been documented in the past. Select an underlined finding; e.g., vomiting. The Lookback Tabs at the bottom update to display the previous notes that include vomiting. The dates are either red (finding was abnormal) or blue (finding was normal). Click a tab to review any of the previous notes. Click back to the Current Encounter tab when done.
-
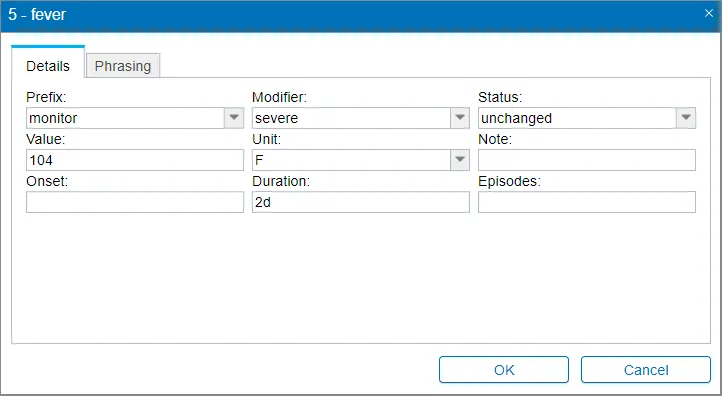
Details (family history, prefix, modifier, status, onset date, free text…) can be added to any finding. Right click on fever in the ROS and select Details. Review the options available in each field.
-
Coding Details: Navigate to the Assessment section (using the Navigation links at the bottom of the screen) and select Asthma. You can quickly see the associated code for a selected finding by clicking on the Coding Task Pane Group in the bottom right of the window. Codes in red are un-reportable; codes in black text are reportable codes. Click back to the Entry Task Pane group when done.
-
You added findings from the Multi-System list and the asthma diagnostic prompt. How do you know which findings belong to which content? Easy. Use the highlight and focus features of Quippe - click once on Asthma from the Sources Task Pane to highlight all the findings that were added from the asthma prompt; now single click on Multi-System to switch to those from the list. Double-click on a source to focus on only those findings associated with that source. Double-click again to return to the full list of findings.
-
Concise View: Once the documentation is complete (you’ve added content and clicked on some findings) go to the Concise view to see what the printed view looks like, using the View>Concise menu. Only the findings that were entered (either positive or negative) are included in this view. To return to entry view, click View>Entry.
-
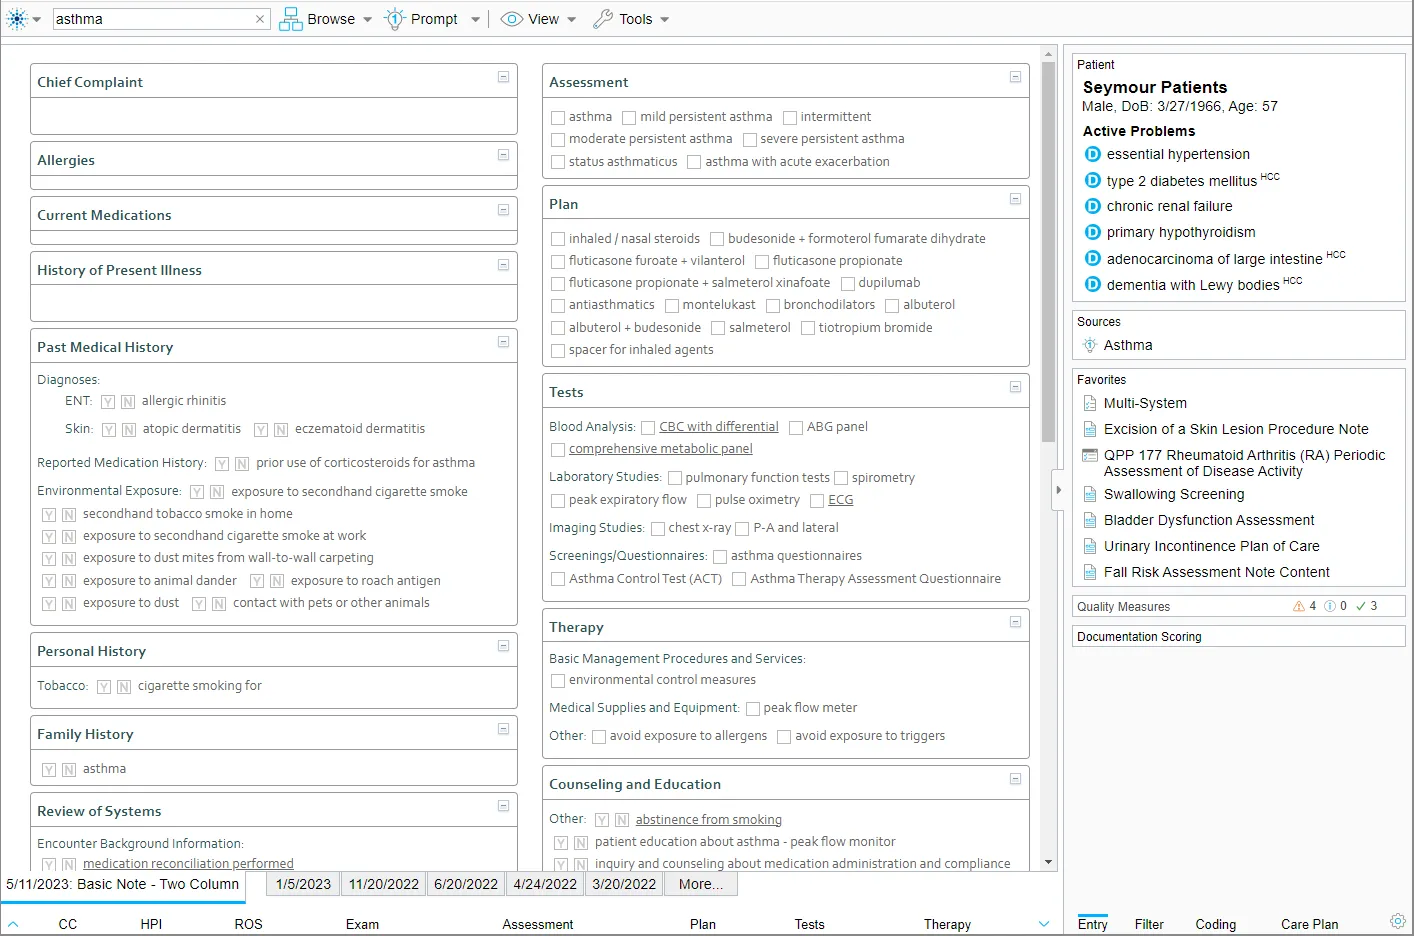
Same Content, Different Layout: Now load the Basic Note – 2 Column template. Go to the Quippe icon in the top left corner and select New. Choose Seymour Patients and the Basic Note - Two Column template. This template contains the exact same structure of the plain Basic Note, but uses a different CSS theme and, therefore, a different format. Do a merge prompt with Asthma again and see the results. The formatting of the two columns and the checkboxes is done when building and/or customizing the template.
Stop 4: Using a Specialty Template
The next stop walks through a document template that is customized around a specialty, in this case, Gastrointestinal. It includes common diagnoses and symptoms, and a basic physical exam. Start a new encounter, select William Atkins and the Gastrointestinal template. Notice that it contains common symptoms, history and physical findings, and the top diagnoses, tests, and plan findings, as seen in the specialty. It is the starting point for the visit and the clinicians become familiar with the content and where things are located in the note. It’s what they routinely do for most of their visits.
Consider this scenario: A patient comes in with heartburn and difficulty swallowing and the clinician is confident the patient has esophageal reflux. This template may not include all the findings needed to document the esophageal reflux. This is where we combine the static GI template for the common findings, with the power of the dynamic diagnostic prompt.
- Navigate to the Assessment section and select esophageal reflux.
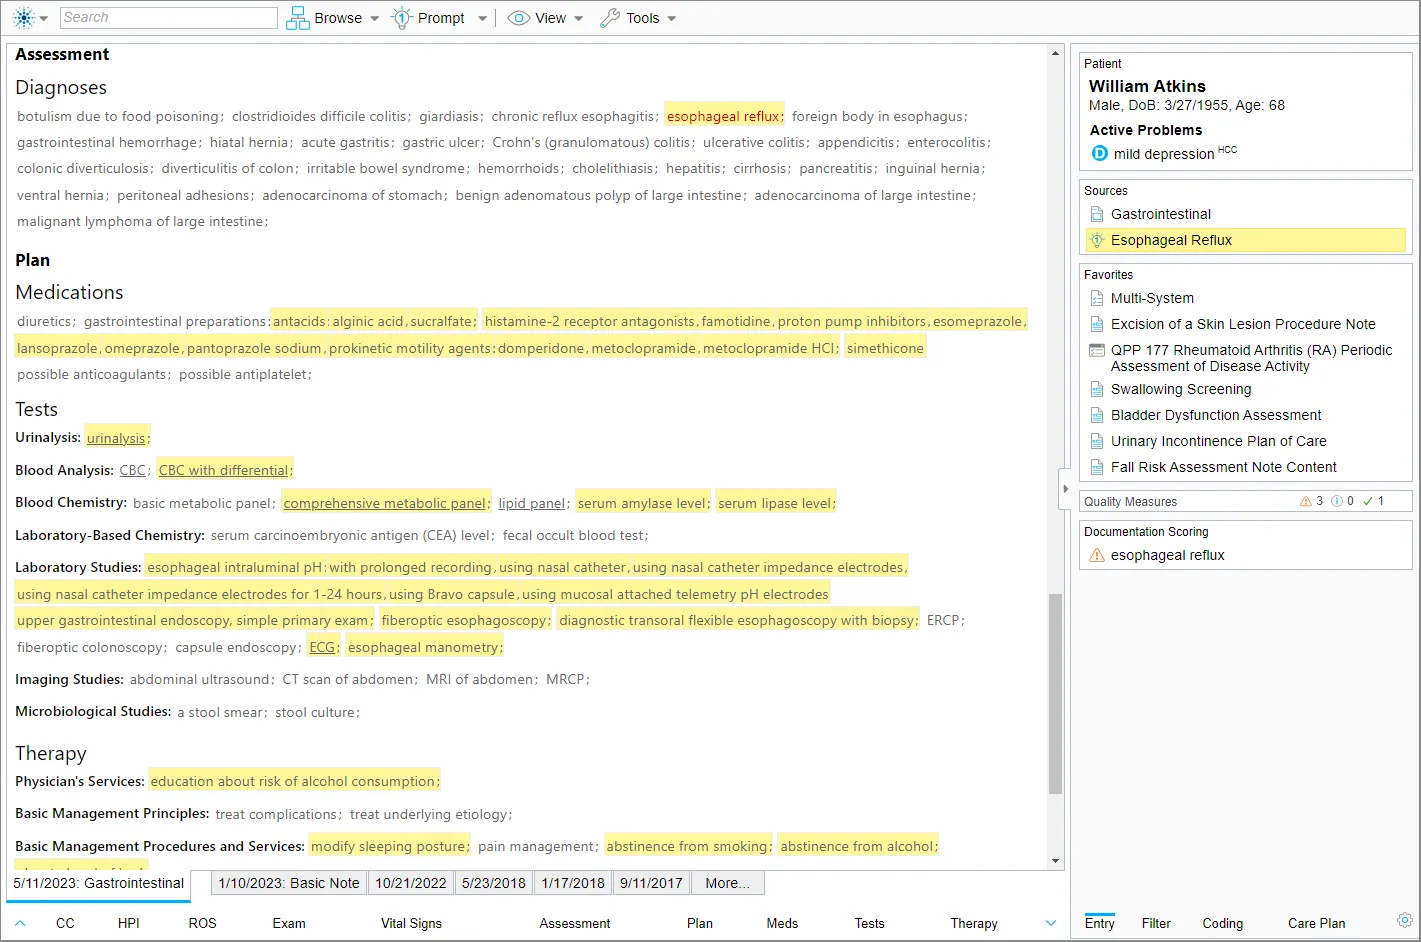
- Now, do a Dx Prompt – right click on esophageal reflux and select Prompt. Congratulations! You used the power of the Quippe Engine to generate a list of findings related to esophageal reflux, combined with the routine items from the base template. No need for a separate, disease specific template.
To see the specific findings related to esophageal reflux, single click on esophageal reflux from the Sources Pane. The associated findings are highlighted in the note. Continue the documentation process or create another scenario of your own.
Useful Aspects
-
A template like the GI template may be the only template needed to document most of the visits in a given specialty or clinic. If built according to common visit types and a common exam, the Clinical Data Engine will do the heavy lifting for you and pull in relevant findings. This strategy can be adapted to the inpatient wards, ancillaries, or home health.
-
The Diagnostic Prompt brings in findings related to the selected diagnosis, providing disease specific content.
-
The Sources pane on the right includes the searches, prompts and other sources of the content in the workspace. Single click to highlight associated findings; double-click to show only the associated findings; double-click again to get back to the full list.
-
Otherwise Normal: This time-saving function helps with customized lists and templates. Right click on the Physical Exam heading and select Otherwise Normal. Notice that any findings not already entered will be entered in their “normal” state. Be careful, though, as you need to ensure that the list of findings is something done on a routine basis.
[!NOTE]
Some findings will remain in their gray or unentered state. They are child findings of a negative finding so there is no need to negate them as well. For example, on the GI exam, abnormal breath sounds, adventitious sounds, friction rub, and wheezing are all subs of ‘lungs clear to auscultation.’ If the lungs are clear, there is no need to negate the child findings.
- Any of the templates in the Shared Library can be customized to fit your workflows. In most cases, our templates contain too many findings, which is time-consuming for the clinicians to read through. It is our belief, though, that it is easier to remove findings, than to add them.
Stop 5: Adding Content to a Note
Along with the documentation template, lists and note content are used to pull in content that is more form-like or standardized. Examples include tables with formulas, questionnaires, and standardized lists. These can be merged into your note as needed. Frequently used lists and notes can be marked as Favorites so they are easily accessible during the documentation process.
Lists
Start a new encounter for William Atkins using the Basic Note template. Conduct a search for the Upper Respiratory list. Select it from the search results and click Add to Note. This is simply a list of findings for upper respiratory conditions, no structure or formatting. Notice the findings are placed in the appropriate container within the note, according to the grouping rules of the template.
Note Content
Note Content includes findings but has specific format and structure, like checkboxes, tables, columns, and conditional styling.
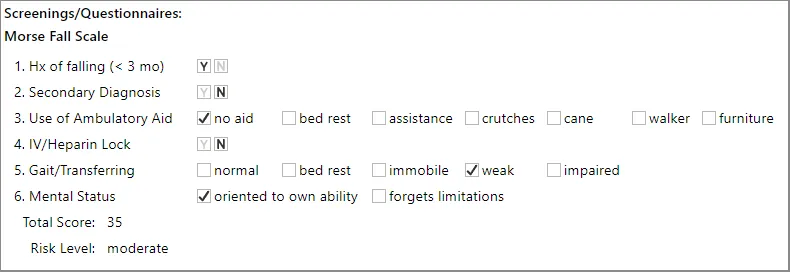
Conduct a search for the Morse Fall Scale. Select it from the search results and click Add to Note. This note content was built to determine the risk factors for the patient. The table contains the risk items and the score is automatically calculated based on the selections.
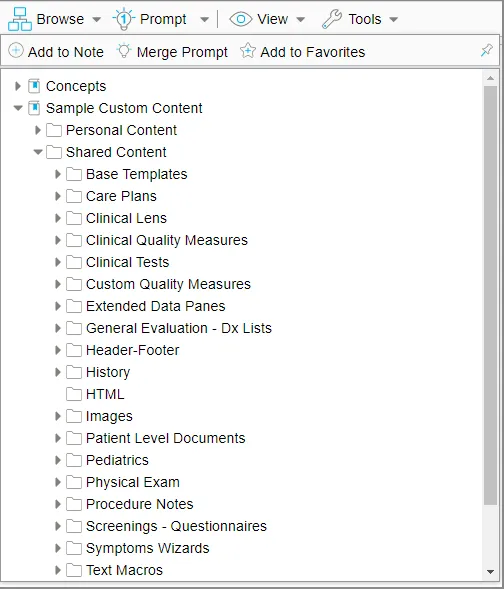
Take a tour of other lists and note content examples. Some are located in the Favorites pane. Others can be merged directly from the Content Library by clicking Browse>Sample Custom Content>General Evaluation - Dx Lists folder. Select a note content/list and either drag it to the workspace or click Add to Note from the search results.
Examples include:
- Swallowing Screening and Bladder Dysfunction Assessment from the Favorites pane.
- PHQ-9 Note Content
- EDD and GA Calculator
- Weight and Height
- Gender Identity
- Cranial Nerves Note Content - right click on the Normal column and select Otherwise Normal to mark the nerves intact.
Useful Aspects
-
Multiple Lists and Note Content can be merged into a single note.
-
Note Content can contain findings and tables that include formulas. They can also contain conditional formatting (Swallowing Screening).
-
Lists and Note Content are displayed in the Sources pane so you can use the Highlight and Focus feature to see associated findings.
-
Content that is not needed for every visit can be built out and be ready for when it is needed, keeping the template clean and useable.
Stop 6: Pop-up Forms (Wizards)
In addition to templates, lists, and note content, pop-up forms are used to capture content on a single page or through a series of pages or tabs. The benefit of a wizard is the ability to control what is added back into the note, where it is added and how it looks when it gets there. It is also useful for organizing a large number of findings for easy documentation, without cluttering up the template.
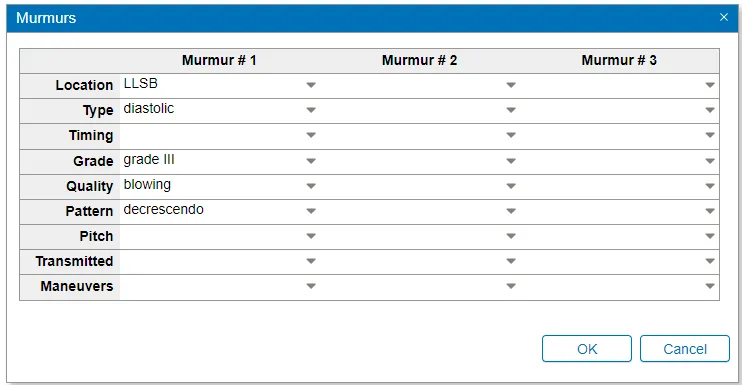
- Start a new encounter with the Basic Note. Then search for and add the Murmur Details Table - Option List (search on just ‘murmur details) to the note. This form is used to describe heart murmurs and contains access to 615 findings! But they are well-organized into a table with drop-downs lists. You would never include all of these findings directly in a template so the pop-up allows you to provide a lot of content at the clinician’s fingertips. Once you’ve made your selections, only the findings documented are added to the note, in their respective places.

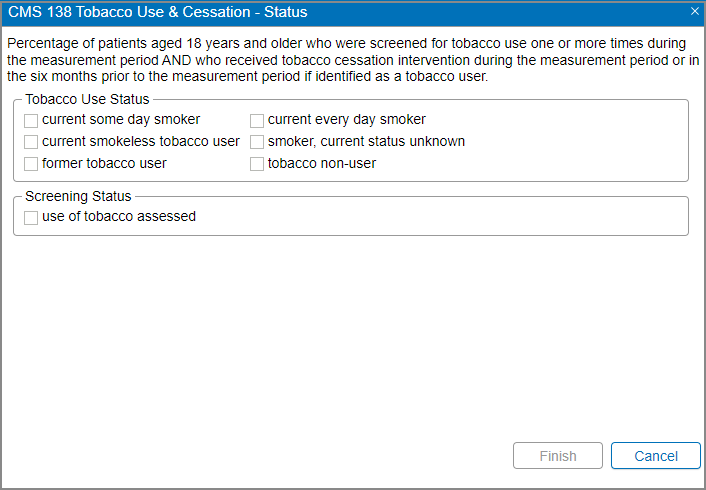
- A multi-page form, or a wizard, on the other hand, is much more versatile. With conditional styling, showing concepts based on the clinician’s responses, it can lead a user down a path to gather critical data. A good example is the CMS 138 Tobacco Use and Cessation wizard. It was built to meet the requirements of the Clinical Quality Measure guidelines and provides the clinician exactly what is needed to meet the measure. The wizard is comprised of multiple pages that display based on whether the patient smokes and what type of tobacco is smoked. If the patient does not smoke, only one page is needed. Search for and add CMS 138 to your note. Run through the wizard once, as a smoker, and once as a non-smoker, to view the difference in behavior based on your selections.
In the Shared Content Library, the CQM Wizards folder contains many examples of how and when to use wizards. Take some time exploring them to see what is possible.
Additional Examples:
- PHQ-9 Wizard: The full form is added to the note once completed.
- Apgar Score: Only the final score is added to the note.
- AHC HRSN Screening (SDOH) Wizard
- Glasgow Coma Scale
- Edema Wizard
Useful Aspects
-
Pop-up forms can be used to guide clinicians through a decision tree or set of guidelines.
-
They can include a large number of findings, but the designer determines how and where the content is added back to the note.
Stop 7: Text Macros
Text Macros are blocks of free text that are used repetitively to document a procedure, education, even patient consent. In addition to the free text, variable fields are used to allow for customization of the free text based on the specific patient and situation.
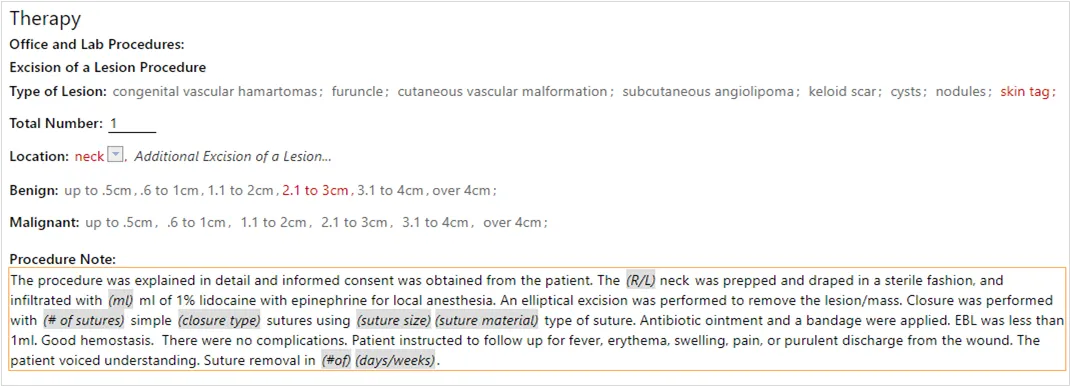
Start a new encounter using the Basic Note template. Now merge in the Excision of a Skin Lesion Procedure Note from the Favorites Pane. The procedure note is added with the name of the procedure, the details about the lesion and the actual procedure text, which is the text macro. Notice the fields highlighted in gray; those are the fields that can be customized per visit. You can either select each field individually or perform a right-click on the note and select Data Field Entry to view all the fields at once.
Useful Aspects
-
Text Macros can be created for frequently used free text: procedure notes, patient education, or informed consent forms.
-
Generic notes are created but then customized through the variable fields for each patient and situation.
-
Saving the macros as Favorites makes them easily accessible during the documentation process.
There are several examples of macros used to record a procedure in the Procedures Notes folder in the Shared Content Library.
Stop 8: E&M Calculator
Quippe includes an E&M Calculator that takes into account the patient information, documented note and visit parameters to provide a suggested E&M Code that can then be added directly to the note. The 1995/97 or 2021 guidelines can be used to suggest an appropriate E&M code.
Document a note using one of the templates from the previous stops. Be sure to add findings from the ROS, exam, assessment, and plan sections. Then click Tools>E&M Calculator to view the calculator at the bottom of the Quippe screen. There are default settings for the visit parameters but these can be changed based on the situation and location. The E&M code is updated based on selections in the note as well as in the E&M Calculator panel.
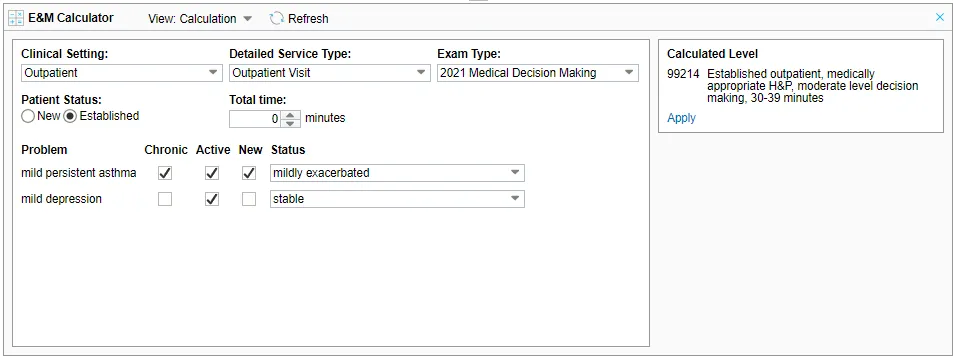
Create several notes, change the parameters of the visit, and then calculate the E&M Code. Further details on how the code is calculated can be found here. Close the E&M Calculator using the blue ‘x’ in the top right corner of the calculator pane.
Useful Aspects
- An accurate E&M code is calculated based on the note. The one caveat is that the calculator uses the structured findings for the calculation. The more free text or non-Quippe terms, the less accurate it is.
- For the 95/97 Guidelines, click the View drop-down and select Analysis to see what systems and bullets were met for each of the required categories: History, Examination and Medical Decision Making. A quick look shows the calculated level for each category. Expanding each section provides additional details into how the code was calculated. Expanding to the last level displays the actual findings that are documented in the note. For 2021 Guidelines, the Analysis provides a breakdown of the levels for each E&M element.
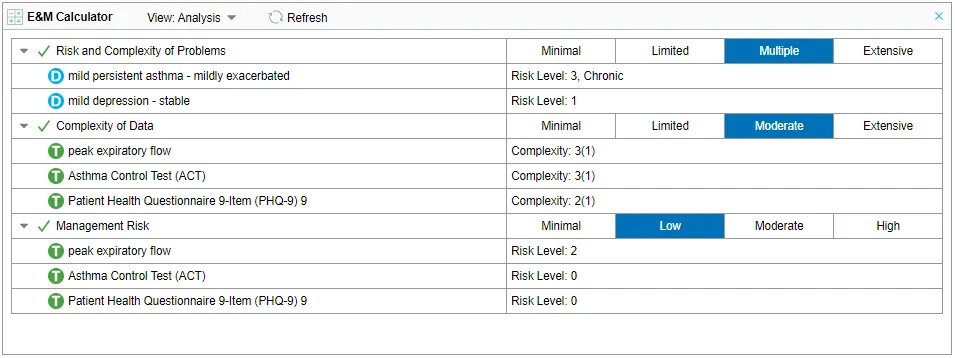
- With the 2021 Guidelines, the E&M is determined either by medical decision making or time. The accompanying note must include an ‘adequate’ history and physical.
- For details as to how Quippe calculates the E&M Code for 2021 MDM, load the 2021 E&M template.
Stop 9: Clinical Quality Measures
Quippe provides the tools and data necessary for providers to utilize Clinical Quality Measures (CQMs) to improve patient care and monitor quality compliance at the point of care without interrupting workflow. This includes support for Merit-based Incentive Payment Program (MIPS) measures, including full implementations of all electronic CQMs (eCQMs) for eligible clinicians and a majority of the registry/claims measures defined in the Quality Payment Program (QPP). Customization of these tools are possible to support a variety of implementations.
Features include a CQM evaluation service, which determines the applicable measures for a patient and their status, and CQM Wizards to assist with the documentation requirements.
Start a new encounter for Seymour Patients using the Basic Note. Expand the Quality Measures Task Pane to see the status of the measures being tracked specific to this patient. In this case, the documentation for 4 measures is incomplete and one is complete; and the patient is excluded from the colorectal cancer and depression screening due to the problems in his chart.
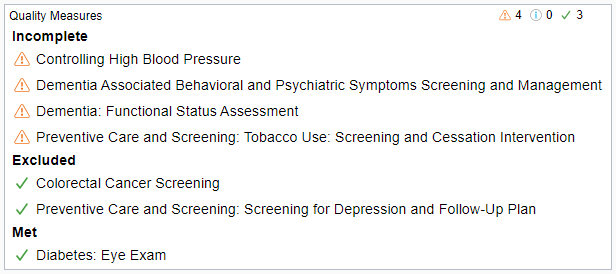
The wizards come into play to document the requirements for incomplete measures. Double-click the Tobacco Use Screening measure to open the corresponding wizard. To meet the measure, the patient’s tobacco status must be documented. If the patient is a non-user, then you are done. If the patient is a tobacco user, the wizard walks you through a few pages to document the type of tobacco and a treatment plan.
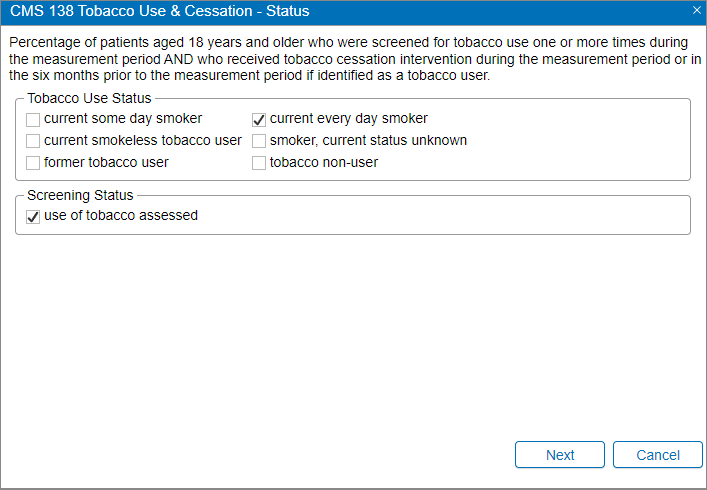
Note the Finish button is disabled because the documentation is not complete. If tobacco non-user is selected, the Finish button becomes active. If the patient is a smoker, the Finish* button changes to a Next* button, to guide the user through the rest of the measure documentation. Click Finish once the documentation is complete and the selected findings are added to the note.
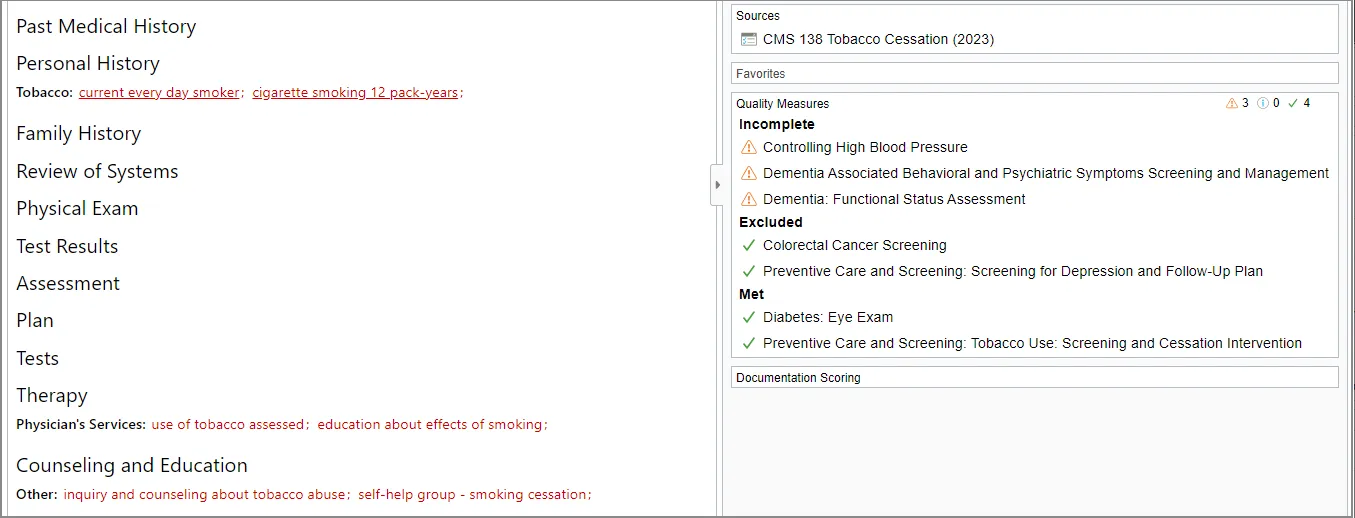
Try going through some of the other measures that are applicable to Seymour. The rest of the CQM wizards are included in the Shared Content Library and you can get a full list of measures and more detailed information here.
Useful Aspects:
- The CQM service provides real-time analysis of each measure to determine the applicability and status for the patient.
- The wizards provide everything needed to complete the documentation requirements.
- Clinicians can take care of their patients while complying with the CQMs.
Stop 10: Support for Hierarchical Condition Category Coding
Quippe includes support for the risk-based adjustment model used by Medicare Advantage programs. The HCC Service is similar to the CQM service, as it looks through the patient’s chart for the given collection period and returns an overall risk score. It also provides reminders for the clinician to ensure that the documentation and coding of any HCC diagnosis is complete.
Let’s start with a new encounter for William Atkins. Mr. Atkins is over 65 and is enrolled in Medicare Advantage. Note that he has an HCC diagnosis already on his problem list - mild depression. Open the HCC Analysis panel to see the estimated risk score for Mr. Atkins. Click View and select HCC Analysis.
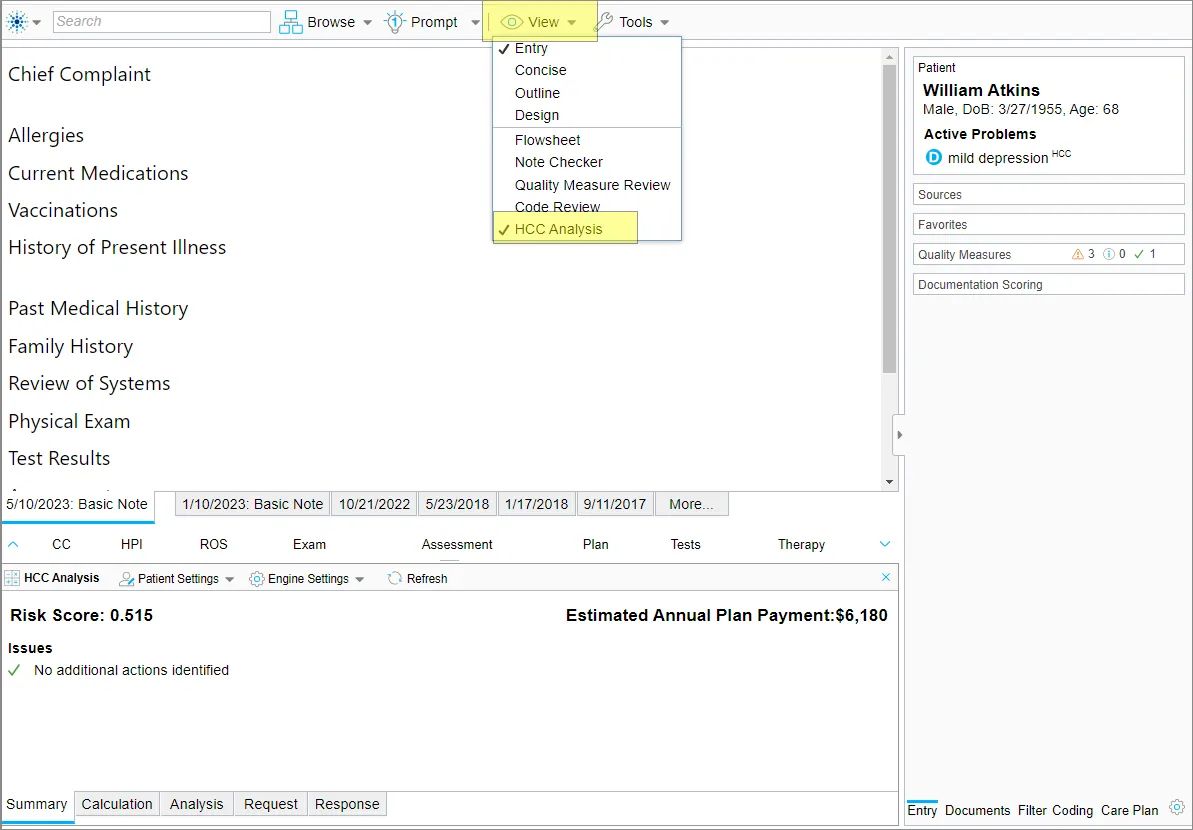
The Summary tab displays the current risk and payment estimates, in addition to any issues found in the patient’s chart related to HCC scoring, of which there are none at the moment. Click over to the Calculation tab to see how the score is being calculated. Points are added for the patient’s age and the problem of mild depression already documented this year. Click back to the Summary tab.
We are going to add a few HCC diagnoses just to demonstrate how the service works.
In the Search, type ‘CHF’ and select congestive heart failure. Note the HCC tag indicating that CHF is an HCC diagnosis. Select the diagnosis in the note and notice the recommendation that displays in the HCC window - CHF is not on the problem list. In order for a diagnosis to count towards an HCC it must be documented in the current year and on the patient’s problem list. No worries, Quippe provides actions to resolve the issue - click Add to Active Problems. We now need to be specific about the ICD-10 code - click Code Picker, I50.9, and then Apply. Feel free to jump back to the Calculation tab to see the changes.
Do another search for and add chronic kidney disease (stage 3, 4, or 5) to the note as positive. Again, you will need to add the diagnosis to the problem list, and we are then presented with a question about whether or not there is an interaction between the CHF and kidney disease. For confirmed interactions, take the Link Findings action. On the Link Findings dialog, everything is correct so simply click OK. This action links the two findings in the note and updates the risk score accordingly. Check out the Calculated tab!
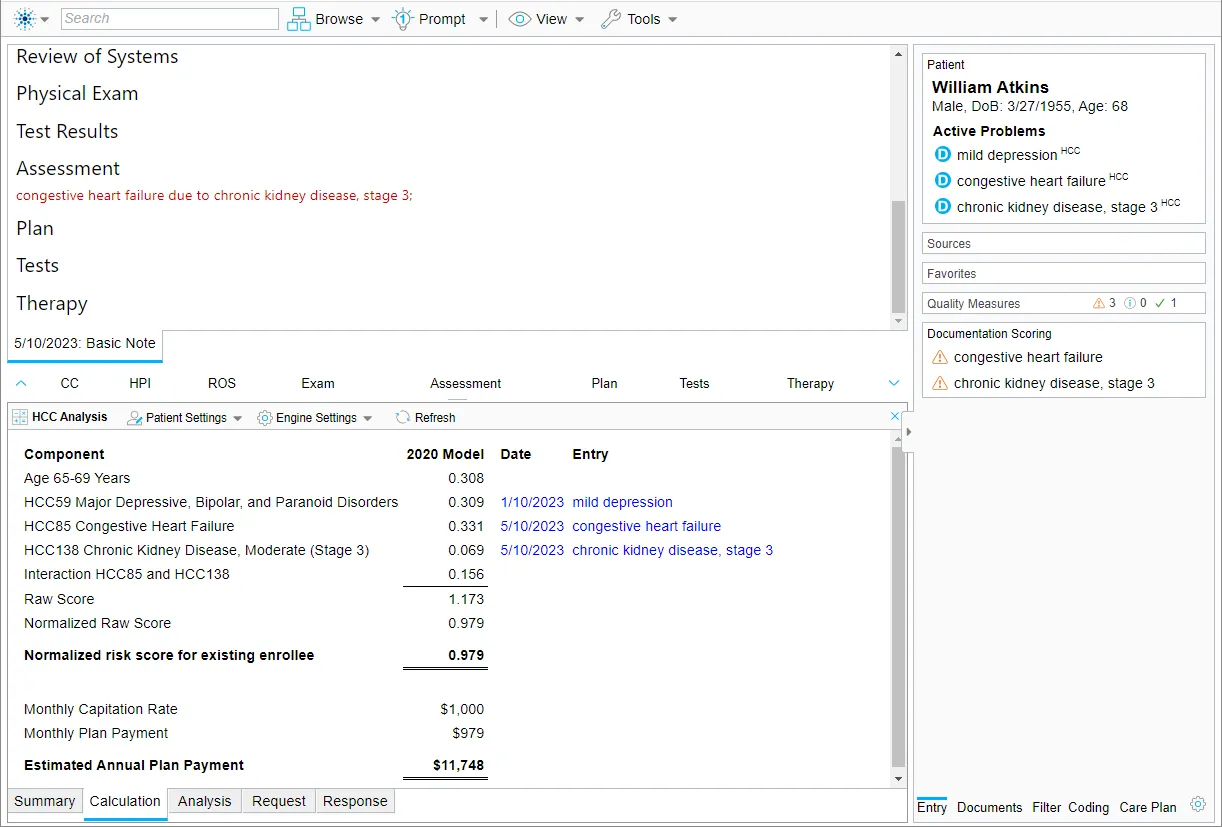
Now, we have just added diagnoses to the note with no documentation. If this chart were audited it would clearly fail as the need for appropriate documentation of the HCC diagnoses is not met. While taking care of the patient, the clinician can use the diagnostic prompt to get a list of related findings for the diagnosis or pull in any content from the library to assist with documentation.
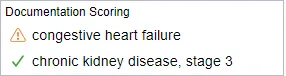
Quippe does include a sanity check of sorts, in the Documentation Scoring tool. This provides a quick review of the note to provide feedback as to the completeness of the documentation for the given diagnosis. Currently, the documentation scoring for both CHF and chronic kidney disease is suspect as we have not completed the note. Quippe leverages the diagnostic prompt and the 95/97 E&M Guidelines to make this determination, in addition to documentation of a plan and therapy item for the diagnosis. As the note is completed, the icon next to the diagnosis is updated, with a green checkmark indicating the documentation is not incomplete. As medicine is complicated, there may be some diagnoses for which a green checkmark will not be seen.
Useful Aspects
- Clinicians are given feedback while they are still with the patient, not months later.
- The HCC indicator alerts the clinicians of an HCC diagnosis.
- Documentation Scoring Tool provides immediate feedback regarding the completeness of documentation.
Stop 11: Well Child Visits
The Quippe Library includes content to support the 4th edition of the Bright Futures Program, providing age-appropriate content as it is needed. The content is organized by age cohort in the Well Child Content folder within the library. The core of the content is the Well Child Visit template which includes auto-merge rules that load categories of content based on the age of the patient.
To walk through this template, you need a patient between the age of 1 day to 21 years. The Quippe Sandbox includes Precious Bundle and Susie B. Goode, both under 21 years old.
- Start a new encounter with Precious Bundle and the Well Child Visit template. The template loads with the appropriate Bright Futures content for the age of the patient. The Sources pane includes all the content from the template, from the exam, milestones, risk, screening and immunizations.
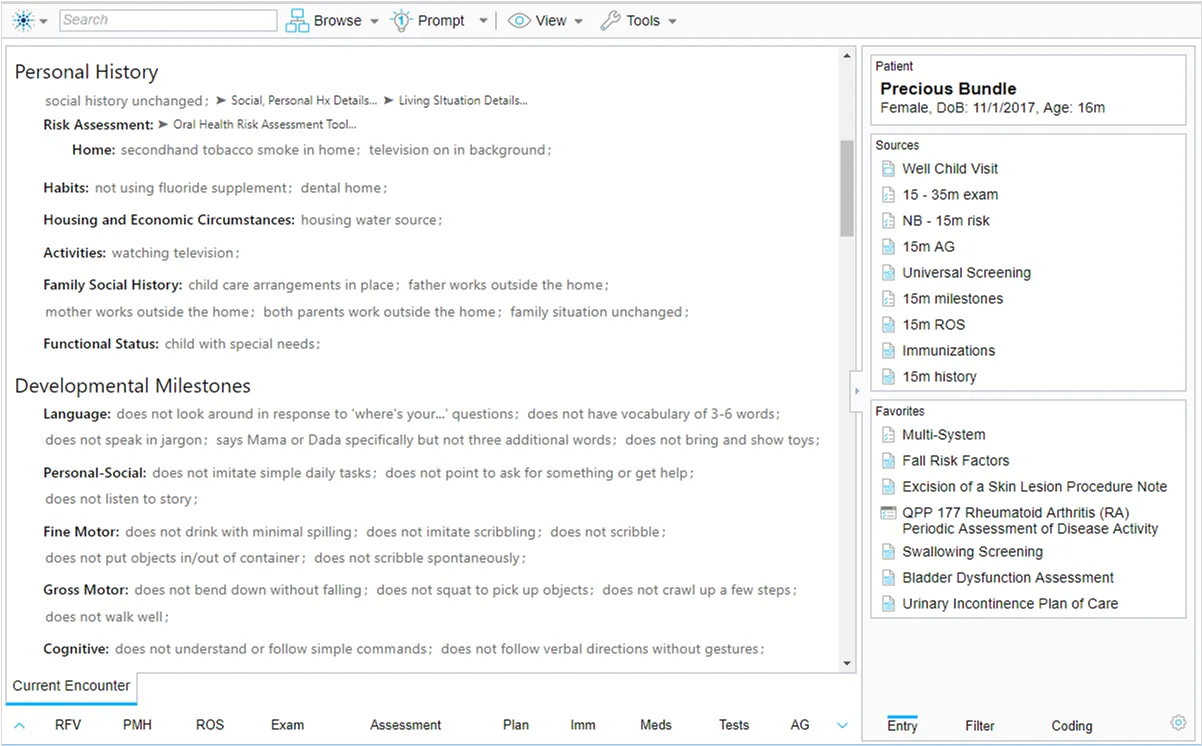
The Bright Futures Guidelines are extensive and it would be crazy to include everything on the template. Clinicians never review all of the guidelines in one visit; they focus on the core guidelines and items that pertain to that specific patient. However, clinicians need to be able to access all the guidelines, as needed. In several sections of the template, the included items are those deemed to be ‘core’ by our pediatric consultants. The rest of the items are housed in pop-up wizards. The Exam is a good example. The template contains the core exam items and the Extended Physical Exam link displays the rest of the exam items. The Anticipatory Guidance section is set up the same.
Walk through the template from top to bottom and document a well child visit. Some findings, when documented as positive, open additional detailed findings. The immunization section contains not only the vaccines, but also the billing codes for the selected vaccines. Create other patients of varying ages to see the difference in content loaded for each one.
Useful Aspects:
- All the Bright Futures Guidelines are accessible by the clinician when they are needed.
- The content is filtered by age and sex of the patient. No need to load additional content.
Stop 12: Clinical Lens
Quippe Clinical Lens provides the ability to present the patient’s full chart in a useful, organized way, as opposed to just a single note. This allows the clinician to review the patient’s current state of health, applying a variety of filters.
Start a new note with Seymour Patients and the Basic Note template. In Quippe, open Clinical Lens by going to the Tools>Quippe Clinical Lens menu option.
Lens displays the Summary tab which contains the most recent instance of findings documented in the chart, organized into ‘clinical buckets’ based on the various FHIR categories.
Reviewing the Patient Chart
- The lab tests show spark lines to provide a visual cue as to how the patient is doing. Click on an individual spark line to view the full graph on the Flowsheet tab. Click the blue ‘x’ in the right corner to close the graph and return to the Summary tab.
- Select a problem in the Filter by Problem pane to highlight the findings in the chart that are related to the selected problem.
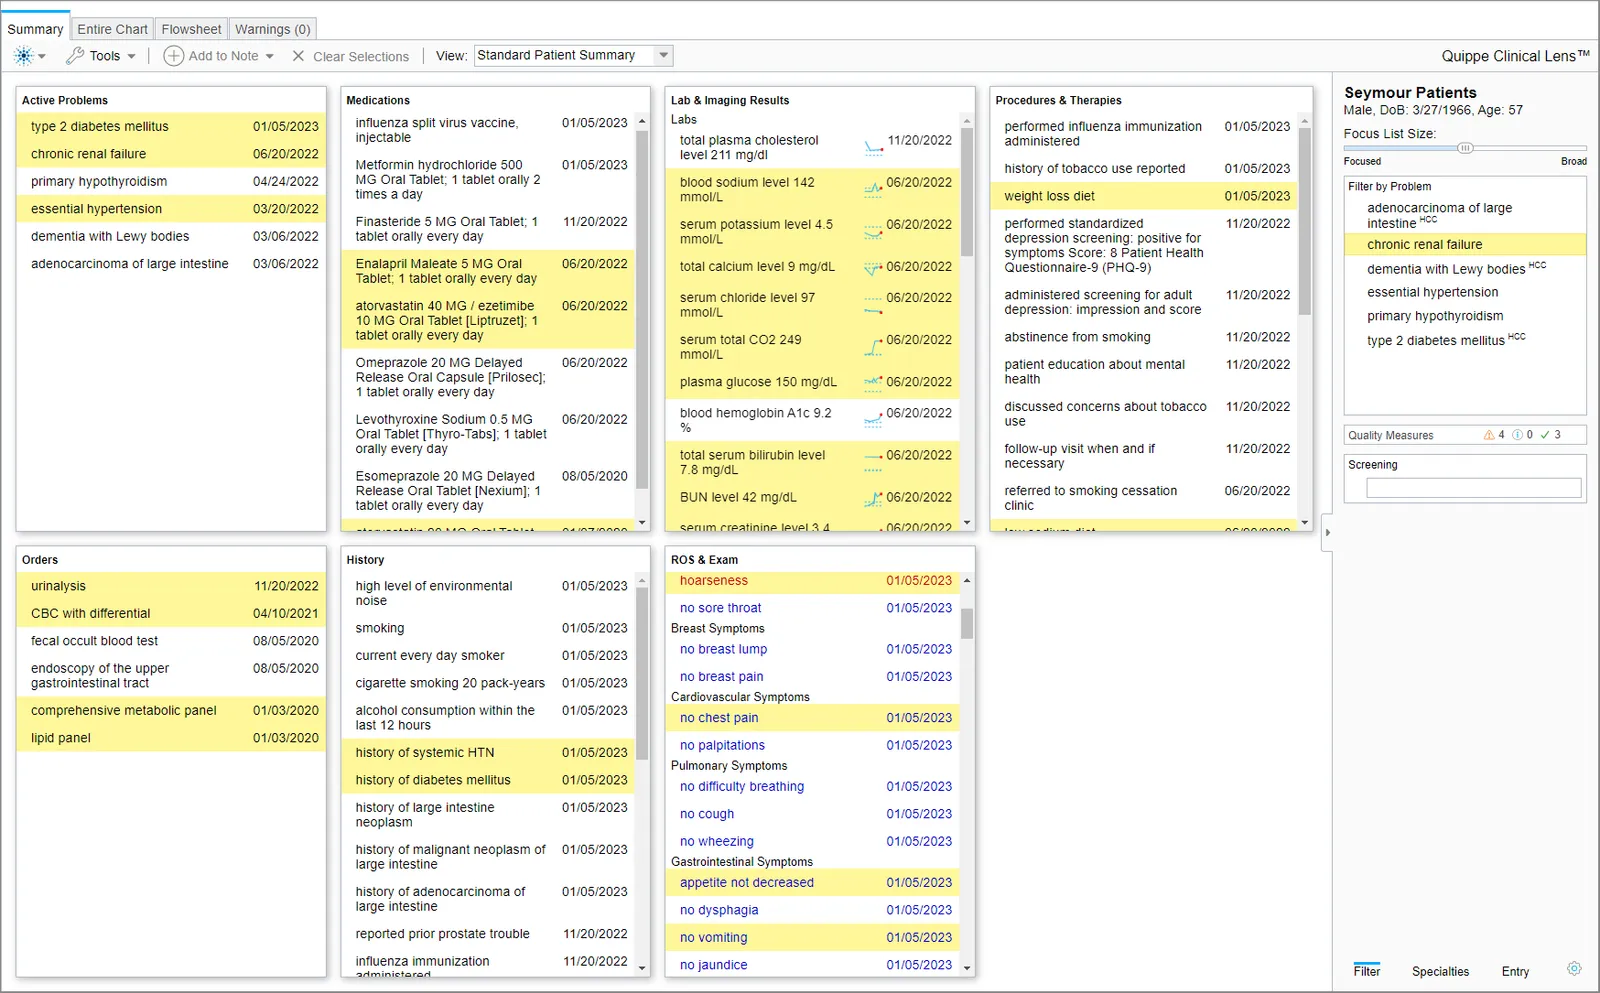
- Double-click the problem to see only those findings related to the diagnosis.
- The Screening pane is used to review the chart for findings related to a suspected diagnosis. Try screening for bacterial pneumonia. Once a diagnosis is selected from the search results, the findings related to that diagnosis are highlighted in the patient’s chart.
Using the Chart Data to Start a Note
- You can also use the findings in Lens to start a note. Let’s say the patient is here for chronic renal failure. Select the diagnosis to see the related findings. You want to reorder the Enalapril Maleate and to cite the results for the BUN level and the serum creatinine into the note. Click each item.
- Click Add to Note>Add to New Note>Basic Note. A note using the Basic Note template is started, using the findings selected from the patient chart.
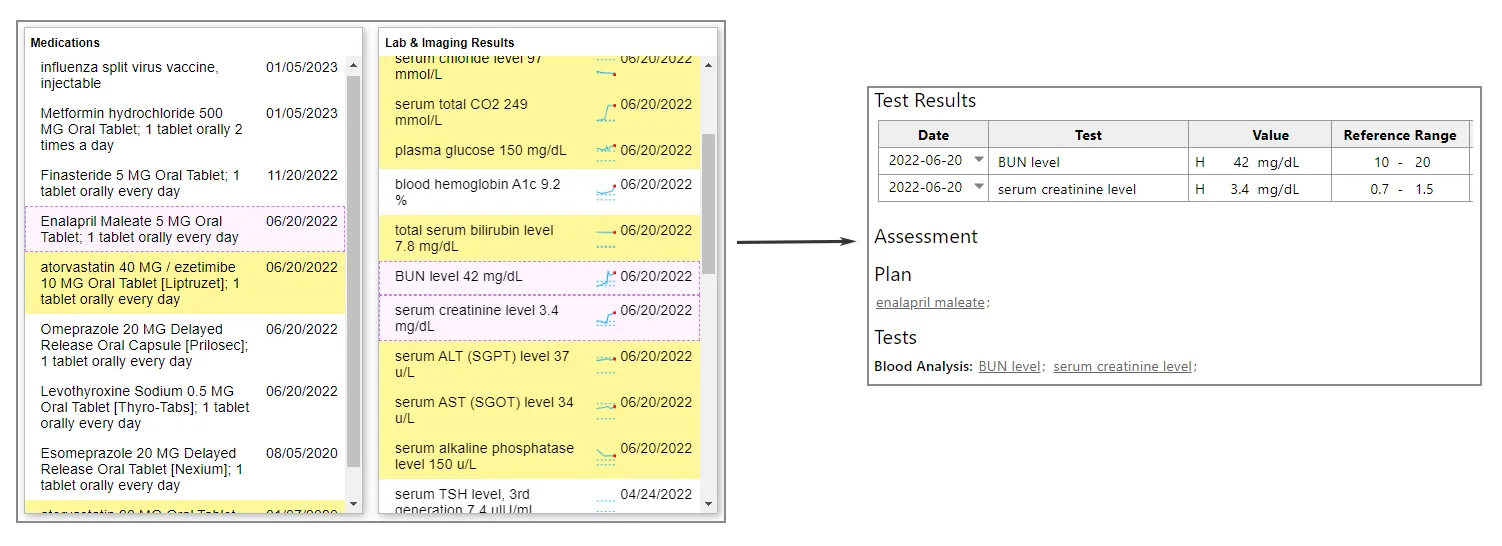
Useful Aspects
- Lens can be the starting point of the visit, providing an overall view of the chart, highlighting items relevant to a problem and then starting the note with selected findings from the chart.
- Data can be from existing Quippe data or external data available through the FHIR and SMART APIs. If external, the data is mapped to Quippe findings using the standard terminologies (ICD, CPT, LOINC, SNOMED).
- Lens can be customized to suit a variety of workflows, from Care Plans to Nursing dashboards.
Stop 13: Shared Content Library
The items in the Shared Content Library are included as examples and starting points for your implementation. Some elements can be used “out-of-the-box”, while others may need to be modified to support a specific workflow or requirement. Take some time to review the contents and become familiar with what has already been created. Use the Browse>Sample Custom Content>Shared Content menu to access the shared Content Library and select items to add to the note for review.
Stop 14: Web Service Tester
Our last stop takes a peek under the hood of Quippe. The Web Service Tester exposes the web services used to pass data into the UI. To open the Web Service Tester, use the Tools>Developer Tools>Web Service Tester option.
Take a look at the Quippe search service. Expand Quippe and select the Search service. Since we searched for Asthma earlier in Quippe, let’s do the same here. In the Query field, type Asthma. The other fields can be used to further define or limit the search. Under DataFormat, select JSON (note the other formats that are available). Click Submit Request. The search results are returned in the specified format.
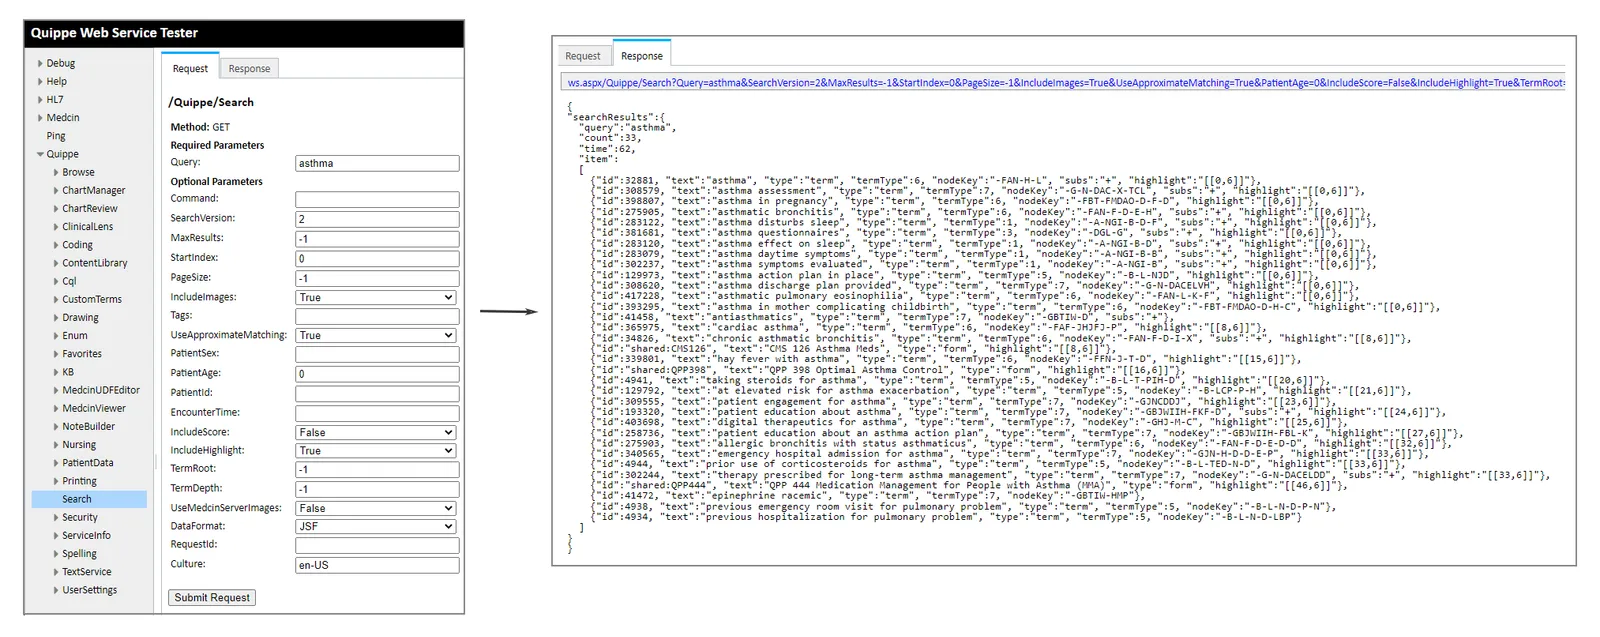
We also did a prompt on asthma. The QuickPrompt web service is what is called to accomplish a prompt. With Quippe expanded, expand NoteBuilder and click QuickPrompt. Enter the following data and click Submit Request.
- MedcinId: Id for asthma - 32881
- Patient Id: William Atkins - 222888
- DataFormat: JSON
The results include all the findings related to Asthma that we saw when doing the prompt in Quippe. Note the findings that contain “hasHistory”==true; this indicates findings that have been documented in the past and therefore, need to be underlined in the UI as part of the Lookback feature.
Other technical resources include:
We’ve come to the end of the tour!
Thank you for taking the Quippe Tour! You have seen the highlights of Quippe but there is a lot more to see. For further questions or to see more of Quippe, please contact support@medicomp.com.